
How to make persistent network on Synology docker
Thought of writing this quick article for anyone looking to make your docker instances use the same network IP address each time instances are recreated. Synology has made it easy for users by automating the network connection setup for your docker instances, however you’ll notice that the IP’s change each time the docker instances are recreated.
Changing IP’s become a pain to manage especially if you have firewall rules that restrict access to specific IPs to communicate internally and externally. The below examples will get you started while you can further refine them as needed.
The examples given below either use docker compose files which can be used via Portainer while the other is used via Synology “Task Scheduler”.
Example #1: Docker compose file for installing Homepage
See our review on this here: https://technoyard.com/2023/12/02/how-to-install-homepage-via-portainer-on-your-synology-nas/
version: "3.3"
services:
  homepage:
    image: ghcr.io/gethomepage/homepage:latest
    container_name: homepage
    networks:
     homepagenetwork:
       ipv4_address: 172.128.0.2

    ports:
      - 4560:3000
    volumes:
      - /volume1/docker/homepage:/app/config # Make sure your local config directory exists
      - /var/run/docker.sock:/var/run/docker.sock:ro # (optional) For docker integrations

    restart: unless-stopped

networks:
  homepagenetwork:
   driver: bridge
   ipam:
    config:
    - subnet: 172.128.0.0/24
      gateway: 172.128.0.1
Depending on the type of application you’re using the driver will need to be updated. You can find the related documentation here: https://docs.docker.com/network/drivers/
Once you run the above stack in Portainer, each time you recreate the container it’ll continue to have the same IP address you have specified in “ipv4_address”.
Under networks, you specify the network range for the application to use within the “subnet” section.
Example #2 : Installing Portainer via Task scheduler
Installing Portainer is very straight forward and in this instance you need to create the docker network within Synology Container Manager before proceeding to install Portainer via task scheduler.
Step 1: Create the specific network on container manager
- Open Synology Container Manager
- Go to “Network”
- Click “Add”
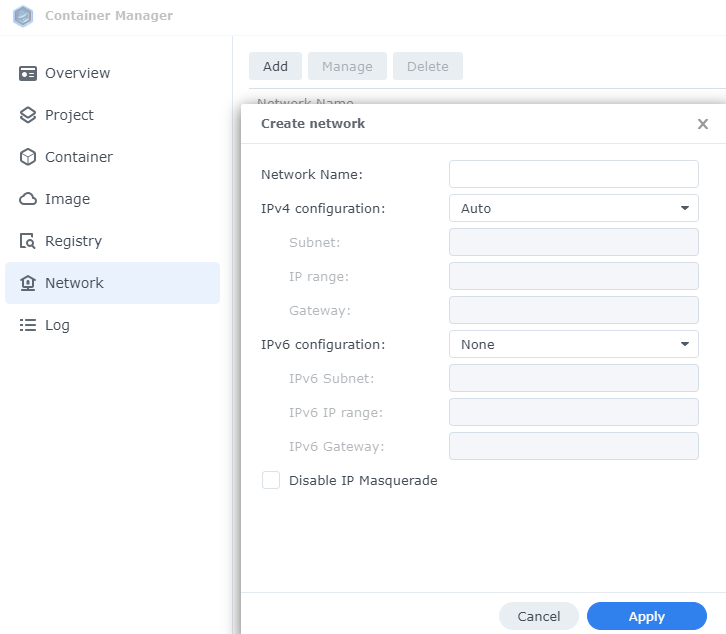
- In the “Network Name” type in “portainer”
- IPv4 configuration should be set to “Manual”
- The subnet and IP range should both contain the network IP and subnet mask
- For example, subnet: 172.128.20.0/24
- IP range: 172.128.20.0/24
- Gateway: 172.128.20.1
- Press Apply.
- This will not create a network with the name “portainer” within the network section of Container Manager.
Next you need to create a user difined script within the scheduled tasks. I’ll not go into the details of that as you can follow the steps given here: https://technoyard.com/2023/06/02/install-photoprism-with-mariadb-on-synology-nas-replacement-for-synology-photos/
In the user-defined script section, add the below script where it will use the network “portainer” you created previously each time the script is run.
docker run -d --name=portainer \
-p 8000:8000 \
-p 9000:9000 \
-v /var/run/docker.sock:/var/run/docker.sock \
-v /volume1/docker/portainer:/data \
--restart=always \
--network=portainer \
portainer/portainer-ce:latest