How to Install Photoprism with MariaDB on Synology NAS – Replacement for Synology / Google Photos
I was recently faced with the situation where I had to move my current Synology NAS data into a completely new Synology NAS. This prompted me to test out the backup and restore functionality of Synology Photos. After performing a full backup of the old NAS via hyper backup, we proceeded to perform the restore function on the new NAS along with all the relevant system configurations. While the restore was successful all my albums were missing. This ended up being escalated to Synology support.
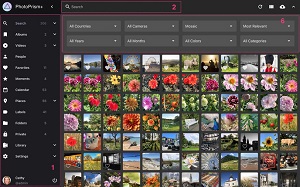
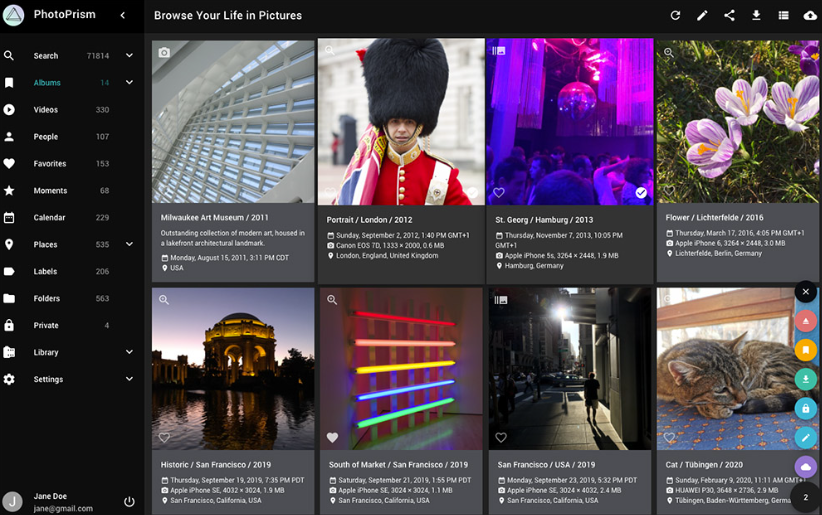
This got me thinking of alternatives where we could easily backup and restore photos and albums created. Our photo collection was over 30,000 images with couple of hundred albums in there and our search landed on Photoprism an open source AI-Powered Photos App.
Photoprism was installed via Synology Docker and portainer to ensure easiest backup and restore functionality if it was ever needed. Okay lets go through the steps.
Step 1 – Install Docker
You need to install docker from the Synology package center. Note that docker works on only selected Synology models and will show up only if it’s supported on your model.

Step 2 : Install Portainer
Portainer provides users an easier way to manage Docker containers vai a web interface as well as deploy new containers through docker compose files. The Synology Docker package has very limited management capabilities at the time of writing, hence any user planning on using Docker on their Synology NAS should most certainly have portainer installed.
- Open File Station and create a folder “docker” (keep file name is simples)
- Create a folder “portainer” inside the “docker” folder created previously.
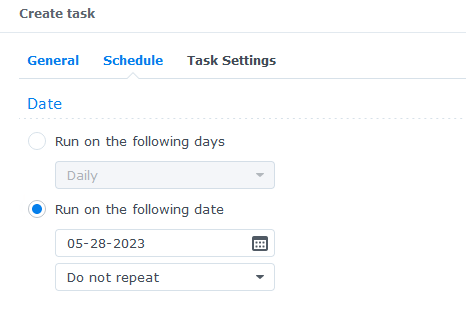
Then open “Control Panel” and go to “Task Scheduler”
- Click on “Create” -> “Scheduled Tasks” -> User-defined scripts
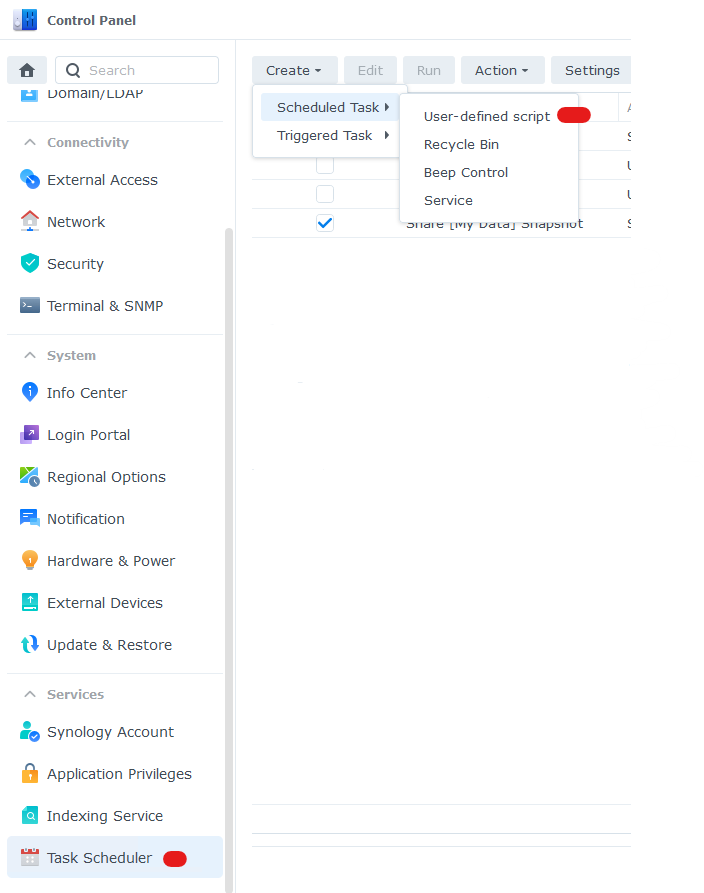
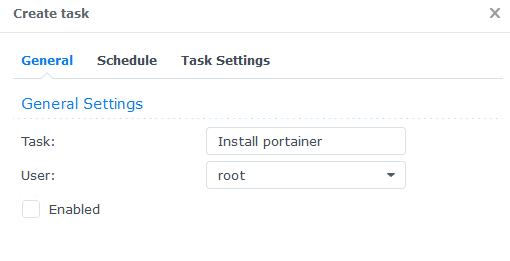
- In the “General” tabl, enter “Install portainer” as the task
- User should be set to root
- Untick “enabled”
Move to the “Schedule” tab
- Select “Run on the following date” and select today’s date
- Select “Do not repeat”
Move to “Task Settings”
- If you have notifications enabled you can add your email address to get notified when the task is complete. This is an optional step and can be skipped.
- Paste the below code in the “Run command” section
docker run -d --name=portainer \
-p 8000:8000 \
-p 9000:9000 \
-v /var/run/docker.sock:/var/run/docker.sock \
-v /volume1/docker/portainer:/data \
--restart=always \
portainer/portainer-ce:latest
Press “OK” in the next screen
- Now you will see “Install Portainer” in the task list. Select the task and press “Run”.
- Select “Yes” in the next screen that asks if you want to run the selected task.
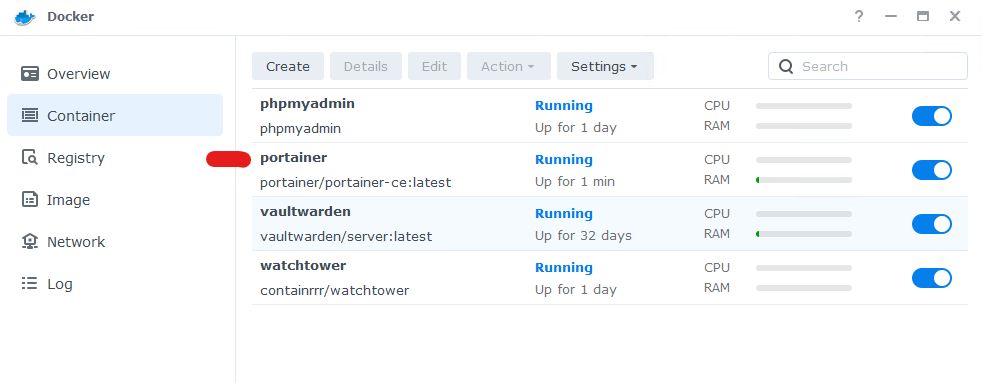
Give it a few minutes and you will see “portainer” as a container running on your docker container list when the installation is complete. If you have setup notifications, you’ll also receive an email once the task is complete.
Now open a web browser and go to “http://Your NAS IP:9000
It’ll prompt you to create a new admin username and password. Once you login with the newly created credentials, you’ll get to the following screen.
- Click on the pencil icon on the right side as shown

In the following screen enter the IP address of your NAS under “Public IP” and click “Update environment”.
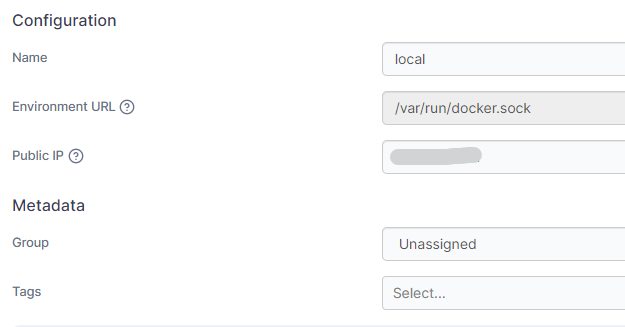
If successful you will see the below message on the top right hand side.
Step 3 – Create the required folders
- Open File station on your Synology NAS
- Create a folder “photoprism” inside the “docker” folder created in the previous step.
- Create the following folders inside the “photoprism” folder
- db
- “config” folder inside the “db” folder created above
- ofelia
- storage
- originals (See comments below before creating this folder)
On my installation I have not created the “originals” folder. The reason being, Photoprism does not have a mobile app natively that would keep images taken on the phone synced with your NAS. Since Synology photos app automatically uploads pictures taken on your mobile phone, I have mapped the originals folder which photoprism would use to the folder created by Synology Photos on the NAS.
This folder is usually “homes/ADMINISTRATOR ACCOUNT NAME/Photos”. This way, it’s easier to keep your photoprism albums upto date without much effort.
If you wanted to keep everything inside the “photoprism” folder, you need to upload/copy all images to the “originals” folder. This can be done now or at the end after all the installations are complete.
Step 4 : Copy scheduled Photoprism job index updating script
For reference Ofelia is a modern and low footprint job scheduler for docker environments and allows us to run custom scheduled jobs easily.
- Copy the jobs.ini to the ofelia folder (Get the file from here)
- Uncomment the jobs you want to run
- The timings show as seconds, minutes, hours
- Copy this jobs.ini file to the “ofelia” folder created previously.
If you wanted to schedule a job to run daily at 1:30 AM you would then update the jobs.ini file as follows
schedule = 0 30 1 * * *– [job-exec “photoprism index”] : This job is needed to automatically update your photos index with new updates. Recommended to run this job off hours as it’ll slow things down.
– If you’re using the import functionality, then you can enable the [job-exec “photoprism import”] job.
– [job-exec “photoprism convert”] job pre-transcodes all videos that are not MP4 / AVC format.
– [job-exec “photoprism backup”] backs up the main database index if you ever needed to restore the main DB index. (recommended to keep this enabled)
Step 5 : Install Photoprism, MariaDB and Ofelia
We will install Photoprism to use MariaDB database. By default Photoprism is setup to use SQLite which would run on the same docker container. However SQLite should only be used for testing and you will be in a world of pain if you used it for day to day use.
- Open Portainer by going to http://your NAS IP:9000 and login
- Click on Home and click on “Stacks”

- Click on “Add Stack” from the top right hand corner.
- You will get the following window
- Enter “photoprism” as the Name
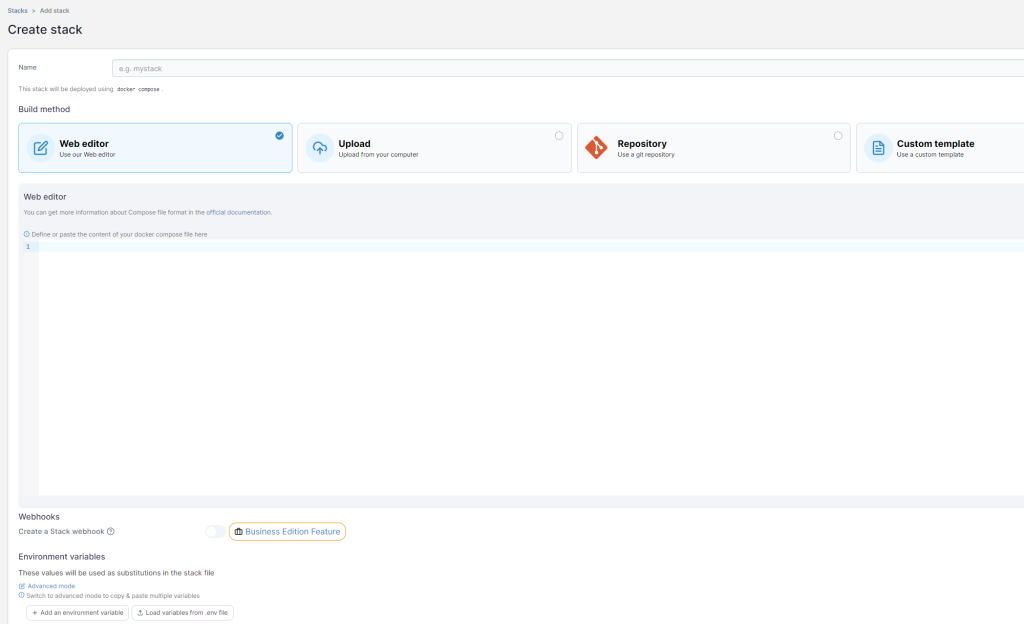
- Copy paste the below code into the web editor window, making sure to change the details outlined. (Copy the code from exactly from the code block or you will get syntax errors)
- Be sure to change the following variables to match your own
- PHOTOPRISM_ADMIN_USER – Provide your own user name
- PHOTOPRISM_ADMIN_PASSWORD – Provide your own password
- PHOTOPRISM_ORIGINALS_LIMIT – Increase this to a high number if you have larger files in your repository
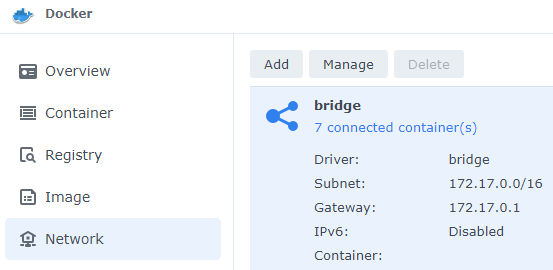
- PHOTOPRISM_DATABASE_SERVER – The gateway IP can be found by going to the docker application and clicking on the “Network” tab. (See screenshot below)
- PHOTOPRISM_DATABASE_PASSWORD – Your own password for Photoprism DB
- MARIADB_PASSWORD – Should be same as “PHOTOPRISM_DATABASE_PASSWORD”
- MARIADB_ROOT_PASSWORD – Root password for MariaDB SQL server
Note: Under the volumes section on the script below, make sure to change the path of the following folder to Synology Photo’s folder location if you don’t want to maintain multiple sources for the same images. eg: “/volume1/docker/photoprism/originals” would look something like “volume1/useraccount name/Photos”
version: '3.5'

services:
  photoprism:
    image: photoprism/photoprism:latest
    container_name: photoprism
    depends_on:
      - mariadb
    restart: unless-stopped
    security_opt:
      - seccomp:unconfined
      - apparmor:unconfined
    ports:
      - "2342:2342" # HTTP port (host:container)
    environment:
      PHOTOPRISM_ADMIN_USER: "ENTER ADMIN USERNAME"                 # superadmin username
      PHOTOPRISM_ADMIN_PASSWORD: "ENTER ADMIN PASSWORD"          # initial superadmin password (minimum 8 characters)
      PHOTOPRISM_AUTH_MODE: "password"               # authentication mode (public, password)
      PHOTOPRISM_SITE_URL: "http://photoprism.me:2342/"  # server URL in the format "http(s)://domain.name(:port)/(path)"
      PHOTOPRISM_ORIGINALS_LIMIT: 5000               # file size limit for originals in MB (increase for high-res video)
      PHOTOPRISM_HTTP_COMPRESSION: "gzip"            # improves transfer speed and bandwidth utilization (none or gzip)
      PHOTOPRISM_LOG_LEVEL: "info"                   # log level: trace, debug, info, warning, error, fatal, or panic
      PHOTOPRISM_READONLY: "false"                   # do not modify originals directory (reduced functionality)
      PHOTOPRISM_EXPERIMENTAL: "false"               # enables experimental features
      PHOTOPRISM_DISABLE_CHOWN: "false"              # disables updating storage permissions via chmod and chown on startup
      PHOTOPRISM_DISABLE_WEBDAV: "false"             # disables built-in WebDAV server
      PHOTOPRISM_DISABLE_SETTINGS: "false"           # disables settings UI and API
      PHOTOPRISM_DISABLE_TENSORFLOW: "false"         # disables all features depending on TensorFlow
      PHOTOPRISM_DISABLE_FACES: "false"              # disables face detection and recognition (requires TensorFlow)
      PHOTOPRISM_DISABLE_CLASSIFICATION: "false"     # disables image classification (requires TensorFlow)
      PHOTOPRISM_DISABLE_RAW: "false"                # disables indexing and conversion of RAW files
      PHOTOPRISM_RAW_PRESETS: "false"                # enables applying user presets when converting RAW files (reduces performance)
      PHOTOPRISM_JPEG_QUALITY: 85                    # a higher value increases the quality and file size of JPEG images and thumbnails (25-100)
      PHOTOPRISM_DETECT_NSFW: "false"                # automatically flags photos as private that MAY be offensive (requires TensorFlow)
      PHOTOPRISM_UPLOAD_NSFW: "true"                 # allows uploads that MAY be offensive (no effect without TensorFlow)
      # PHOTOPRISM_DATABASE_DRIVER: "sqlite"         # SQLite is an embedded database that doesn't require a server
      PHOTOPRISM_DATABASE_DRIVER: "mysql"            # use MariaDB 10.5+ or MySQL 8+ instead of SQLite for improved performance
      PHOTOPRISM_DATABASE_SERVER: "DEFAULT GATEWAY IP FROM DOCKER:3306"     # MariaDB or MySQL database server (hostname:port)
      PHOTOPRISM_DATABASE_NAME: "photoprism"         # MariaDB or MySQL database schema name
      PHOTOPRISM_DATABASE_USER: "photoprism"         # MariaDB or MySQL database user name
      PHOTOPRISM_DATABASE_PASSWORD: "ENTER YOUR OWN DB PASSWORD"       # MariaDB or MySQL database user password
      PHOTOPRISM_SITE_CAPTION: "AI-Powered Photos App"
      PHOTOPRISM_SITE_DESCRIPTION: "AI-Powered Photos App "                # meta site description
      PHOTOPRISM_SITE_AUTHOR: ""                     # meta site author
      PHOTOPRISM_UID: 1026
      PHOTOPRISM_GID: 100
      PHOTOPRISM_UMASK: 0000
    working_dir: "/photoprism" # do not change or remove
    network_mode: bridge
    ## Storage Folders:
    volumes:
      - "/volume1/docker/photoprism/originals:/photoprism/originals"               # Original media files (DO NOT REMOVE)
      # - "/example/family:/photoprism/originals/family" # *Additional* media folders can be mounted like this
      # - "~/Import:/photoprism/import"                  # *Optional* base folder from which files can be imported to originals
      - "/volume1/docker/photoprism/storage:/photoprism/storage"                  # *Writable* stache, database, and sidecar files (DO NOT REMOVE)

  ## Database Server (recommended)
  mariadb:
    restart: unless-stopped
    image: mariadb:10.10
    container_name: mariadb
    security_opt: # see https://github.com/MariaDB/mariadb-docker/issues/434#issuecomment-1136151239
      - seccomp:unconfined
      - apparmor:unconfined
    ports:
      - "3306:3306" # HTTP port (host:container)
    command: mysqld --innodb-buffer-pool-size=512M --transaction-isolation=READ-COMMITTED --character-set-server=utf8mb4 --collation-server=utf8mb4_unicode_ci --max-connections=512 --innodb-rollback-on-timeout=OFF --innodb-lock-wait-timeout=120
    volumes:
      - "/volume1/docker/photoprism/db/config:/var/lib/mysql" # DO NOT REMOVE
    environment:
      MARIADB_INITDB_SKIP_TZINFO: "1"
      MARIADB_DATABASE: "photoprism"
      MARIADB_USER: "photoprism"
      MARIADB_PASSWORD: "ENTER YOUR OWN DB PASSWORD"
      MARIADB_ROOT_PASSWORD: "ENTER YOUR OWN ROOT DB PASSWORD"
    network_mode: bridge
  ## Ofelia Job Runner (recommended for running background jobs and making sure new pictures gets indexed)
  ## see https://github.com/mcuadros/ofelia
  ofelia:
    restart: unless-stopped
    image: mcuadros/ofelia:latest
    container_name: ofelia
    volumes:
      - "/var/run/docker.sock:/var/run/docker.sock:ro"
      - "/volume1/docker/photoprism/ofelia/jobs.ini:/etc/ofelia/config.ini"
    network_mode: bridge
Step 6 : Deployment
If no syntax errors are shown in the web editor, you can now proceed to deploy the above docker compose file.
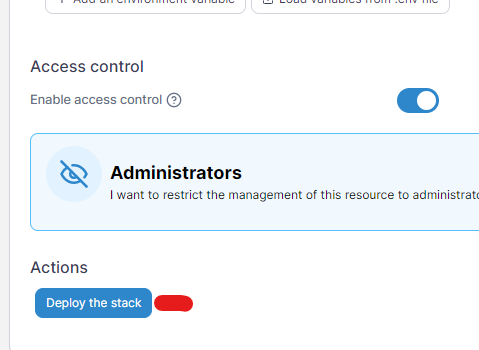
- Click on “Deploy the stack” button at the bottom of the screen.
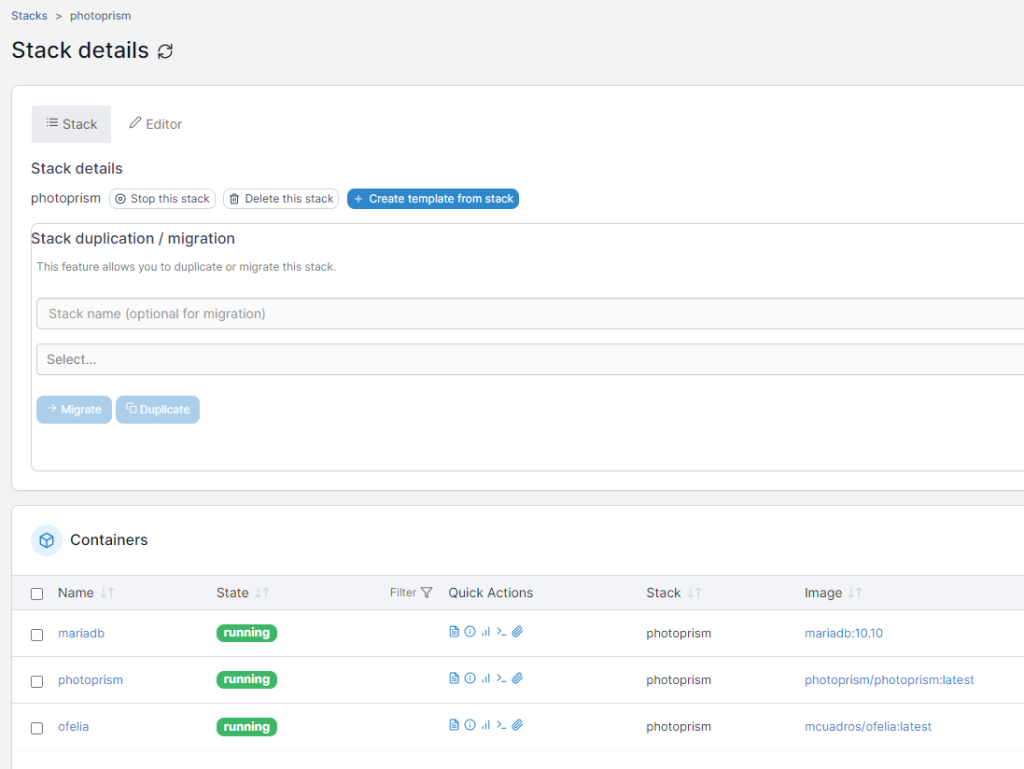
- If no errors are found, you will now see 3 containers running under the photoprism stack.
Step 7 : Testing
You will need to give MairaDB and Photoprism around 15-20 minutes to initialize and set everything up before you can login.
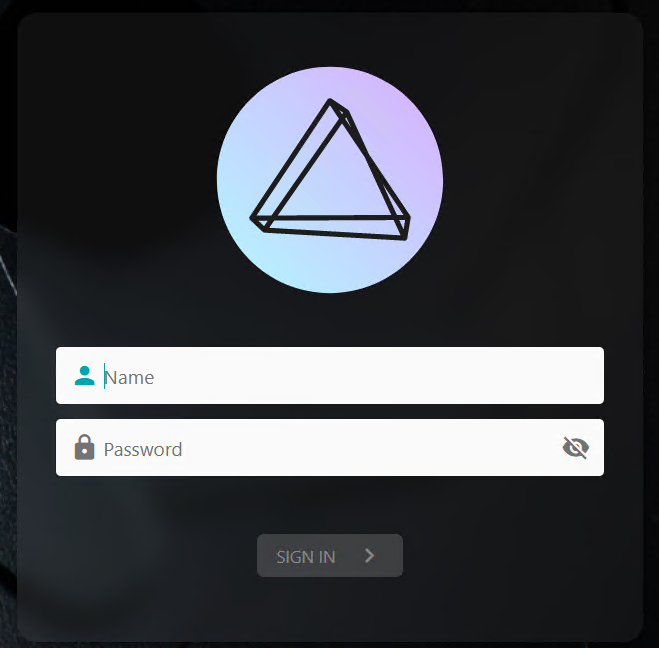
- You should go to http://your NAS IP:2342
This should bring you to the Photoprism login screen. If you see an error, give it some more time as it could just be that Photoprism is still setting things up in the background.
Enjoy your new Photoprism installation!
Some known and expected errors
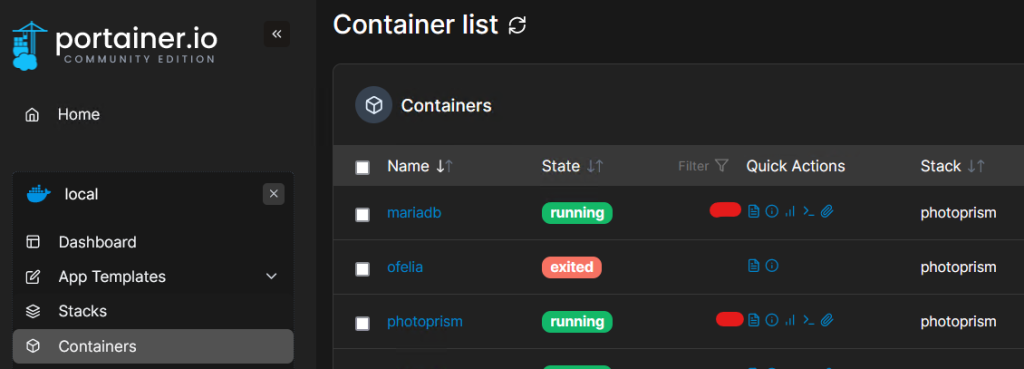
- Login to Portainer and go to the “Containers” tab.
- Click on “Logs” icon for each to see the status for each of these containers.
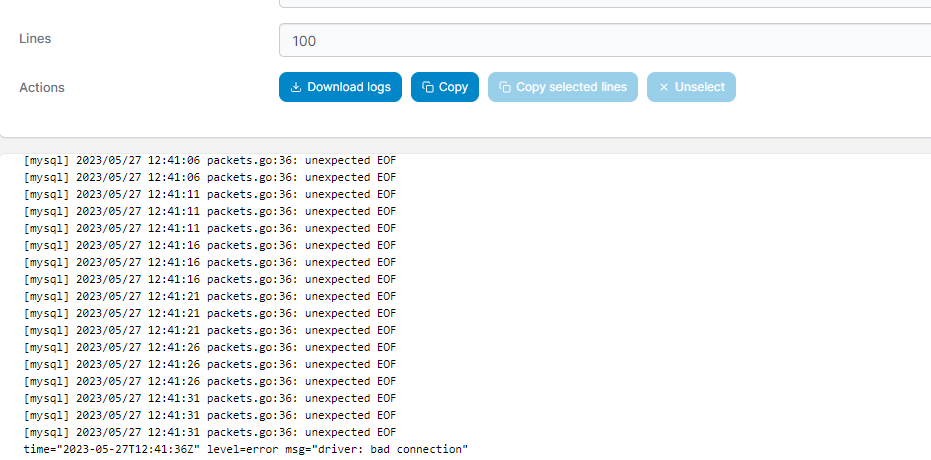
- If you see errors as below on your “mariadb” container logs, give it some time. Mariadb won’t allow any connections through until it’s fully initialised.
- If for some unknown reason Photoprism fails to load, stop the “Photoprism” stack, then delete any files created inside the db and storage folders on the “photoprism” folder. Then redeploy the photoprism stack once more.
Thank you very much for this information. One suggestion is you wrote you did not create the originals folder since you used your own folder. However, you did not explain what to change to achieve this. I got an error in deployment initially and had to figure out what to change.
For anyone interested, you will need to replace the first part of the originals storage line with your own folder name if you have not created the original folder.
## Storage Folders:
volumes:
– “YOUR FOLDER:/photoprism/originals” # Original media files (DO NOT REMOVE)
# – “/example/family:/photoprism/originals/family” # *Additional* media folders can be mounted like this
# – “~/Import:/photoprism/import” # *Optional* base folder from which files can be imported to originals
– “/volume1/docker/photoprism/storage:/photoprism/storage” # *Writable* stache, database, and sidecar files (DO NOT REMOVE)
Hey mate,
Thanks for the update. just to clarify on above
“/volume1/docker/photoprism/originals” is the default originals file location if you wanted to keep all your original files inside the docker container.
However the folder location to use if you wanted to use the same folder as Synology Photos, you will use something similar to below. The account name will be unique to your install and I haven’t tested this out if it’s using multiple accounts.
“/volume1/homes/ADMINISTRATOR ACCOUNT NAME/Photos”
Thanks
Hello,
This is a very useful tutorial.
However I’m struggling to connect my global /volume1/photo folder accessible from Photoprism.
I get permission denied errors when trying to access sub-folders.
How to grant Photoprism access to this folder and all sub-folders?
Thanks
Hi Denis
Are you sure the photo folder location is correct? It’s usually “user account name/photos”
Mind sharing the script for the folder locations only to have a quick look.
Hi Techno,
The location of the photo folder was correct (/volume1/photo).
This is strange but after a while, Photoprism started to read the sub-folders without problem.
It takes some time because I have a lot of photos, but it works finally.
Thank you
Denis
That’s great to hear Denis. Yes Photoprism and Mariadb can take a while to initialize which is probably what was happening. I listed some of the errors we noticed during our setup under “Some known and expected errors”, however we didn’t encounter the error you noticed. But it’s good to know. thanks.
This was a really great tutorial, thank you.
As other comments have said, it failed to deploy the first time as I hadn’t changed th Storage Folders Volumes setting to the Synology Photos folder, but it wasn’t difficult to work out. You should add that to the section with variables to check/change.
The first time I deployed, I got permissions errors in both the Mariadb and photoprism containers. I closed the stack, deleted the config files (as mentioned at the end of the tutorial) and restarted the stack and the second time it worked fine.
Photoprism is currently indexing my folders so I don’t yet know how well it works (I’ve only tried it once before as a test, with about 20 images in one folder). I’m looking forward to finding out.
Thanks for the comments Giles, I’ll update the article to mention about the Photos folder. If you got Ofelia running with the settings given it’ll automatically index your photos on schedule. It’s a good alternative/backup to have for Synology Photos and you don’t need to maintain 2 folders containing your original files.
Yes I did set Ofelia up as described in the tutorial. I’d like it to do it on schedule. However, I thought it was a good idea to perform an initla index/scan as I wasn’t seeing any photos. I almost regret it though – it’s been running for about 8 hours now and it’s making my Synology run like a dog!
” It’s a good alternative/backup to have for Synology Photos”
You mean pointing at /homes//Photos, rather than /docker/photoprism/originals, right?
Hi Giles, yes correct i meant pointing at Photos folder. I noticed you’re pointing to home/Photos, so i double checked my install.
On my NAS i have 2 paths.
1. home/Photos
2. /volume1/homes/”adminuser”/Photos
Both these folders contain the same copy of data however on my docker file i’m pointing the the 2nd path and not the 1st. Not sure if that’ll solve your issue, but worth trying that.
Hi Techno,
I’m pointing to /volume1/homes//Photo, not /home/Photos. Sorry, I didn’t make that clear in my previous post.
I also have the same two paths. They contain the same contents as you say. I assume they link to the same folders/files and are not actually two copies. I’ve never copied anything to /home/Photos anyway.
Actually, I’m seeing permission errors when it’s running the initial index. These are happening when it’s automatically converting RAW files to JPEG. The errors are similar to:
media: failed creating fit_2048 (mkdir /photoprism/storage/cache/thumbnails/e/1/8: permission denied)
Looking at the directory /volume1/docker/photoprism/storage/cache/thumbnails/ in File Manager, it’s owned by my Synology admin user, as I would expect. However, the subdirectories of thumbnails (e.g. “e”, as accessed by the above error) are owned by root.
I only created the folder storage, as described in this blogpost. So all of these subdirectories were created by photoprism, as was the thumbnails directory itself. Do you know why these would have different owners and how I can tell Photoprism to create folders/files as my admin user rather than root? Thanks.
Can you double check the PHOTOPRISM_UID, PHOTOPRISM_GID and PHOTOPRISM_UMASK values on your NAS. You can get this by creating a “Scheduled task” ->User defined script.
1. Give it any name
2. User should be the admin user you’ll create photoprism with
3. Under schedule, select run on specific day and select no repeat
4. Under task settings, enter your email to receive the output once the command is run. (Note you’ll need to have setup email notifications for emails to work)
5. under “user defined script” type in the word “id” without brackets.
Confirm the values you get from this to the values on the docker compose file. if they’re different update them to match what your NAS gives.
Also if they’re different, i think it’s best to delete the folders and retry. You should test with a few images only on your originals location as indexing does take a long time depending on the number of images/videos you have. Mine took almost 2 days to complete.
Sorry Techno, I’m a little confused. Where do you create a scheduled task? Inside Ofelia? Inside Docker? In Portainer? In the Synology DSM? Or somewhere else?
the scheduled task, i assume you mean for Ofelia job? If so the jobs.ini file should be inside the ofelia folder you created at the folder creation stage. The jobs.ini file can be found here https://dl.photoprism.app/docker/scheduler/jobs.ini as per the post. Hope that helps 🙂
I assume you’re no longer getting the permission errors?
Hi Techno, I didn’t mean the Ofelia schedule (which I have setup to do scan, as per the instructions. I meant the “Scheduled task” that you said to use to get the uid. I’ve realised now that you mean the Scheduled tasks in Synology control panel.
“User should be the admin user you’ll create photoprism with”
I think this is my main admin user on the synology, the same as the in /homes//Photos. For me this is ellis_admin. However, I’m not sure how to specify this in the Compose file. Should it be used for PHOTOPRISM_ADMIN_USER? I thought that was the user that you log in to Photoprism with and so didn’t have to match the Synology user. If this is not the case then that might be where I made a mistake – I set that to admin, not ellis_admin. I don’t see anywhere else in the docker compose file where you specify the Synology admin user.
“I assume you’re no longer getting the permission errors”
Actually today I am resuming the scan and it is running without errors. However, yestrday it ran for a while with no permission errors, creating thumbnails quite happily, before it suddenly started getting them. Once they started they happedn every time. I don’t know why it changed.
Hi Giles
You need to update the details for these fields if they’re different once you run that scheduled job
PHOTOPRISM_UID:
PHOTOPRISM_GID:
PHOTOPRISM_UMASK:
Thanks
Maybe post your docker compose file if you’re still running into issues, so i could double check if anything obvious is missing
hi,
thanks for this nice howto
my installation is not going forward and I see some Errors in the mariadb container log
2024-03-08 14:14:51 281 [Warning] Aborted connection 281 to db: ‘unconnected’ user: ‘unauthenticated’ host: ‘172.17.0.1’ (This connection closed normally without authentication)
hi, thanks for this nice howto my installation is not going forward and I see some Errors in the mariadb container log 2024-03-08 14:14:51 281 [Warning] Aborted connection 281 to db: ‘unconnected’ user: ‘unauthenticated’ host: ‘172.17.0.1’ (This connection closed normally without authentication)
Hi there
Would you mind posting your compose file to review here. thanks