ASUS CUSL2 Socket-370 i815E ATX Mainboard
The CUSL2 uses Award’s Medallion Bios 6.0, same as what they have been using in their recent boards. The Bios consists of five main menus- Main, Advanced, Power, Boot and Exit. The Medallion Bios features all of the tweaking options we would expect from an Award Bios setup. With Bios updates offered virtually every week ASUS’s Bios support is one of the best.
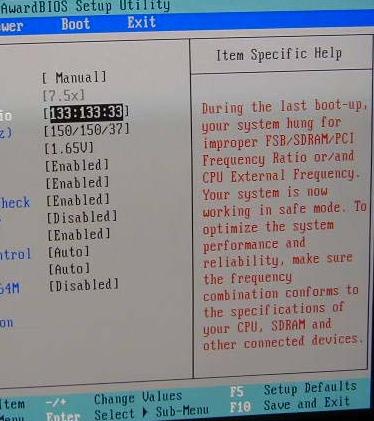
One minus point we noticed with this Bios was that ASUS has failed to include many of the information needed for Bios settings in their Help menu. If you have owned a ASUS board in the recent past you would have noticed that the Help menu offered a great deal of basic information and recommendations for several settings as well. However the CUSL2 only offers some basic information for overclockers, for example, say you overclock your CPU too high, then once you reboot the system the CUSL2 changes back to safe mode settings and the BIOS opens the CPU setup menu letting you know that the settings have to be changed. This is in fact a great feature for all those budding overclockers out there.

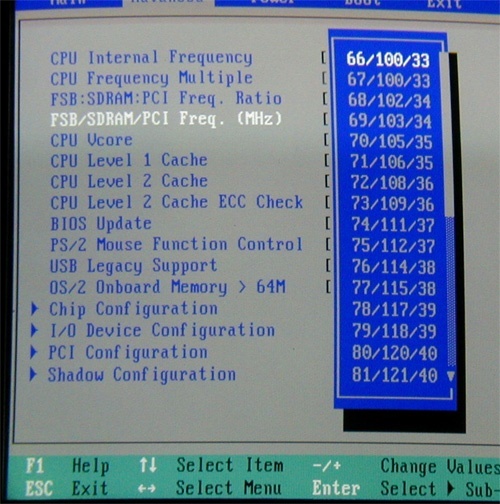
Going into more detail of the Bios, you’ll find ASUS’s JumperFree CPU setup under the Advanced Menu option. This is a dream come true for most of you overclockers out there who really don’t fancy medalling with your motherboard. However if you fancy doing it the hard way ASUS has included DIP switches on the board, yet all FSB speeds aren’t available as in the JumperFree setup. As far as the JumperFree menu goes it is by far one of the easiest and extremely flexible CPU setups I have ever come across. Don’t take my word for it, just take a look at the amount of available FSB speeds it offers; it’s way more than any board I have come across. The great thing about the ASUS CUSL2 is that it allows independent selection of SDRAM: PCI ratio and the FSB speeds, giving it a total of 155 combinations in all. Not bad huh..!

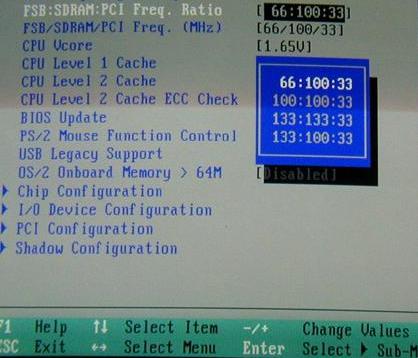
There are four available FSB: SDRAM: PCI ratios to choose from, depending on your system. They are 66:100:33, 100:100:33, 133:100:33, 133:133:33. What makes the CUSL2 unique is due to its flexibility of FSB speed options. The above ratios can be changed in 1Mhz increments, which makes it ideal to get every last drop of power from your system. With some ratios having up to 32 settings themselves, it’s very doubtful that you’ll fail to find the ideal combination to get the most out of your system. The independent selection of FSB: SDRAM and PCI ratios is an incredible feature we could really get used to. Due to this system you can find out the outer limits of your processor and memory. Users with Celeron processors no longer need to be trapped by a 66Mhz memory clock; by selecting the ideal combination as I mentioned before you can dig out that last ounce of power.

CPU and VIO voltages can also be played with within the Bios interface in order to get the best frequencies as possible. One thing’s for sure, the ASUS CUSL2 is truly an overclockers delight. Users with 133Mhz CPU’s get the privilege of using additional FSB speeds, which reach an incredible 216Mhz (yes, you did see it right), yet the practical problem is that no one would be able to use these high speeds in the real world. (yet it’s a cool feature to boast about)
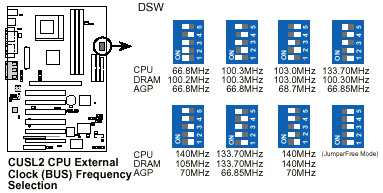
If you still fancy configuring the FSB speeds through the DIP switches located near the IDE interface, then below are a list of options available to you.
